Hi, everyone.
So, the our target is Build and Run Quake3 under Arch Linux Arm.
Information about software and hardware:
Btw, sorry for my English :) It can be mu-u-u-uch better.
So, this task requeres some steps:
0. go home:
$ cd ~
1. Installing git (if you alread have it - just skip this step):
$ sudo pacman -S git
2. Loading Quake3 sources:
$git clone https://github.com/raspberrypi/quake3.git
After that you will have quake3 directory inside your home dir.
3. Editing build.sh with nano editor (if you don't have nano - please, install it using "sudo pacman -S nano" command)
$ nano ~/quake3/build.sh
We need to have build.sh like that (changes for the original marked as bold):
--------------------------------
#!/bin/bash
# this script builds q3 with SDL
# invoke with ./build.sh
# or ./build.sh clean to clean before build
# directory containing the ARM shared libraries (rootfs, lib/ of SD card)
# specifically libEGL.so and libGLESv2.so
ARM_LIBS=/opt/vc/lib
SDL_LIB=lib
# directory containing baseq3/ containing .pk3 files - baseq3 on CD
BASEQ3_DIR="/home/${USER}/"
# directory to find khronos linux make files (with include/ containing
# headers! Make needs them.)
INCLUDES="-I/opt/vc/include"
# prefix of arm cross compiler installed
#CROSS_COMPILE=bcm2708-
---------------------------------
4. Making soft links to the needful header files (vcos_* files):
$ sudo ln -s /opt/vc/include/interface/vcos/pthreads/vcos_futex_mutex.h /opt/vc/include/interface/vcos/
$ sudo ln -s /opt/vc/include/interface/vcos/pthreads/vcos_platform.h /opt/vc/include/interface/vcos/
$ sudo ln -s /opt/vc/include/interface/vcos/pthreads/vcos_platform_types.h /opt/vc/include/interface/vcos/
5. Preparing for build, making our build.sh executable (actually, it's must be executable wright now, but we will do some magic)
$ cd ~/quake3
$ chmod +x ./build.sh
6. Start building (it will take about 1 hour), we must be in the ~/quake3 directory:
$ ./build.sh
If everything OK compile will success, your compile will success. In this case you can go and drink 1 shot of strong tea :)
7. Making installed game. We need to copy compiled files to the destination directory (I called it quake3arena)
$ mkdir ~/quake3arena
$ cd ~/quake3/build/release-linux-arm/
$ cp ioq3ded.arm ~/quake3arena/
$ cp ioquake3.arm ~/quake3arena/
$ mkdir ~/quake3arena/baseq3$ mkdir ~/quake3arena/lib
$ cp ./baseq3/cgamearm.so ~/quake3arena/baseq3/$ cp ./baseq3/qagamearm.so ~/quake3arena/baseq3/$ cp ./baseq3/uiarm.so ~/quake3arena/baseq3/
$ cd ~/quake3/lib
$ cp ./libSDL.so ~/quake3arena/lib/$ cp ./libSDL-1.2.so.0 ~/quake3arena/lib/$ cp ./libSDL-1.2.so.0.11.3 ~/quake3arena/lib/
As result we will have this structure:
8. Retrieving pak* files. You can find them in many other places, but I love complete tuturials, so I will give them to you. So I uploaded them into the Wuala and Dropbox, you can download manually, or by using wget as shown below.
$ mkdir ~/tmp
$ cd ~/tmp
Loading from Dropbox:
$ wget http://dl.dropbox.com/u/23494653/Q3DemoPaks.zip
Loading from Wuala:
$ wget http://content.wuala.com/contents/KittyHawk/quake3/Q3DemoPaks.zip
This file have md5 cafa463365567560c36ef316c95636ef
If you want to check md5 just type "md5sum ~/tmp/Q3DemoPaks.zip", if you don't have md5sum first you will need to install it by "sudo pacman -S mhash"
Unzipping:
$ unzip Q3DemoPaks.zip
Copying resources to the installation.
$ cp ~/tmp/baseq3/pak* ~/quake3arena/baseq3/
9. Making start script. Now we need script, which will start our quake3.
$ nano ~/quake3arena/start.sh
And then (in editor) add this lines:
-------------------------------------
10. Making start script executable.
$ chmod +x ~/quake3arena/start.sh
11. Tuning RPi (video memory size). As writen here, we need to divide memory (256 Mb) between ARM and GPU. Let's split 192M for ARM and 64M GPU split.
$ sudo cp /boot/arm192_start.elf /boot/start.elf && sudo reboot
After that device will reboot.
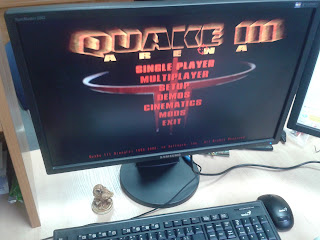
12. Testing our install. So let's execute our installation of Quake 3 arena.
$ cd ~/quake3arena
$ ./start.sh
12a. Cleaning up. If everything is OK we can clean our RPi.
Removing link to the header files:
$ sudo unlink /opt/vc/include/interface/vcos/vcos_platform.h
$ sudo unlink /opt/vc/include/interface/vcos/vcos_platform_types.h
$ sudo unlink /opt/vc/include/interface/vcos/vcos_futex_mutex.h
Cleaning up ./tmp folder:
$ rm ~/tmp/Q3DemoPaks.zip
$ rm -rf ~/tmp/baseq3
Cleaning builded files (we can do this, because we copied needful files to the our quake3 installation):
So, the our target is Build and Run Quake3 under Arch Linux Arm.
Information about software and hardware:
- Raspberry Pi Model B ( marked with "2011");
- ARM Arh Linux (3.2.27-10-ARCH+);
- SanDisk SD card 16 Gb (class 10/UHC);
- Standard PSU (by Farnell)- Output 5V, 1200 mA;
- USB hub (powered - 3A);
- Radio Keyboard and Mouse by Genius.
Btw, sorry for my English :) It can be mu-u-u-uch better.
So, this task requeres some steps:
0. go home:
$ cd ~
1. Installing git (if you alread have it - just skip this step):
$ sudo pacman -S git
2. Loading Quake3 sources:
$git clone https://github.com/raspberrypi/quake3.git
After that you will have quake3 directory inside your home dir.
3. Editing build.sh with nano editor (if you don't have nano - please, install it using "sudo pacman -S nano" command)
$ nano ~/quake3/build.sh
We need to have build.sh like that (changes for the original marked as bold):
--------------------------------
#!/bin/bash
# this script builds q3 with SDL
# invoke with ./build.sh
# or ./build.sh clean to clean before build
# directory containing the ARM shared libraries (rootfs, lib/ of SD card)
# specifically libEGL.so and libGLESv2.so
ARM_LIBS=/opt/vc/lib
SDL_LIB=lib
# directory containing baseq3/ containing .pk3 files - baseq3 on CD
BASEQ3_DIR="/home/${USER}/"
# directory to find khronos linux make files (with include/ containing
# headers! Make needs them.)
INCLUDES="-I/opt/vc/include"
# prefix of arm cross compiler installed
#CROSS_COMPILE=bcm2708-
# clean
if [ $# -ge 1 ] && [ $1 = clean ]; then
echo "clean build"
rm -rf build/*
fi
# sdl not disabled
make -j4 -f Makefile COPYDIR="$BASEQ3_DIR" ARCH=arm \
CC=""$CROSS_COMPILE"gcc" USE_SVN=0 USE_CURL=0 USE_OPENAL=0 \
CFLAGS="-DVCMODS_MISC -DVCMODS_OPENGLES -DVCMODS_DEPTH -DVCMODS_REPLACETRIG $INCLUDES" \
LDFLAGS="-L"$ARM_LIBS" -L$SDL_LIB -lSDL -lvchostif -lvmcs_rpc_client -lvcfiled_check -lpthread -lbcm_host -lkhrn_static -lvchiq_arm -lopenmaxil -lEGL -lGLESv2 -lvcos -lrt"
# copy the required pak3 files over
# cp "$BASEQ3_DIR"/baseq3/*.pk3 "build/release-linux-arm/baseq3/"
# cp -a lib build/release-linux-arm/baseq3/
exit 0
---------------------------------
4. Making soft links to the needful header files (vcos_* files):
$ sudo ln -s /opt/vc/include/interface/vcos/pthreads/vcos_futex_mutex.h /opt/vc/include/interface/vcos/
$ sudo ln -s /opt/vc/include/interface/vcos/pthreads/vcos_platform.h /opt/vc/include/interface/vcos/
$ sudo ln -s /opt/vc/include/interface/vcos/pthreads/vcos_platform_types.h /opt/vc/include/interface/vcos/
5. Preparing for build, making our build.sh executable (actually, it's must be executable wright now, but we will do some magic)
$ cd ~/quake3
$ chmod +x ./build.sh
6. Start building (it will take about 1 hour), we must be in the ~/quake3 directory:
$ ./build.sh
If everything OK compile will success, your compile will success. In this case you can go and drink 1 shot of strong tea :)
7. Making installed game. We need to copy compiled files to the destination directory (I called it quake3arena)
$ mkdir ~/quake3arena
$ cd ~/quake3/build/release-linux-arm/
$ cp ioq3ded.arm ~/quake3arena/
$ cp ioquake3.arm ~/quake3arena/
$ mkdir ~/quake3arena/baseq3$ mkdir ~/quake3arena/lib
$ cp ./baseq3/cgamearm.so ~/quake3arena/baseq3/$ cp ./baseq3/qagamearm.so ~/quake3arena/baseq3/$ cp ./baseq3/uiarm.so ~/quake3arena/baseq3/
$ cd ~/quake3/lib
$ cp ./libSDL.so ~/quake3arena/lib/$ cp ./libSDL-1.2.so.0 ~/quake3arena/lib/$ cp ./libSDL-1.2.so.0.11.3 ~/quake3arena/lib/
As result we will have this structure:
quake3arena/ioq3ded.arm
quake3arena/ioquake3.arm
quake3arena/baseq3/cgamearm.so
quake3arena/baseq3/qagamearm.so
quake3arena/baseq3/uiarm.so
quake3arena/lib/libSDL.so
quake3arena/lib/libSDL-1.2.so.0
quake3arena/lib/libSDL-1.2.so.0.11.3
8. Retrieving pak* files. You can find them in many other places, but I love complete tuturials, so I will give them to you. So I uploaded them into the Wuala and Dropbox, you can download manually, or by using wget as shown below.
$ mkdir ~/tmp
$ cd ~/tmp
Loading from Dropbox:
$ wget http://dl.dropbox.com/u/23494653/Q3DemoPaks.zip
Loading from Wuala:
$ wget http://content.wuala.com/contents/KittyHawk/quake3/Q3DemoPaks.zip
This file have md5 cafa463365567560c36ef316c95636ef
If you want to check md5 just type "md5sum ~/tmp/Q3DemoPaks.zip", if you don't have md5sum first you will need to install it by "sudo pacman -S mhash"
Unzipping:
$ unzip Q3DemoPaks.zip
Copying resources to the installation.
$ cp ~/tmp/baseq3/pak* ~/quake3arena/baseq3/
9. Making start script. Now we need script, which will start our quake3.
$ nano ~/quake3arena/start.sh
And then (in editor) add this lines:
-------------------------------------
#!/bin/bash-------------------------------------
sudo LD_LIBRARY_PATH=lib:/opt/vc/lib ./ioquake3.arm
10. Making start script executable.
$ chmod +x ~/quake3arena/start.sh
11. Tuning RPi (video memory size). As writen here, we need to divide memory (256 Mb) between ARM and GPU. Let's split 192M for ARM and 64M GPU split.
$ sudo cp /boot/arm192_start.elf /boot/start.elf && sudo reboot
After that device will reboot.
12. Testing our install. So let's execute our installation of Quake 3 arena.
$ cd ~/quake3arena
$ ./start.sh
12a. Cleaning up. If everything is OK we can clean our RPi.
Removing link to the header files:
$ sudo unlink /opt/vc/include/interface/vcos/vcos_platform.h
$ sudo unlink /opt/vc/include/interface/vcos/vcos_platform_types.h
$ sudo unlink /opt/vc/include/interface/vcos/vcos_futex_mutex.h
Cleaning up ./tmp folder:
$ rm ~/tmp/Q3DemoPaks.zip
$ rm -rf ~/tmp/baseq3
Cleaning builded files (we can do this, because we copied needful files to the our quake3 installation):
$ rm -rf ~/quake3/build
Also, if you don't need this sources you can remove them (if you like):
$ rm -rf ~/quake3
So, I hope that you succeeded!!! Enjoy!

Hey, thanks for the tutorial! I managed to get the game running but there's no sound. I'm sure the sound is working fine on my pi, because I tested it using sound-test in alsa. Do you have a guess on why I have no sound?
ОтветитьУдалить